The next in my series of “around the room” games is sculpture. The goal is to expose my students to a vast array of sculpture related vocabulary, materials and techniques in the shortest amount of time.
I created 5 different sculpture project mini-centers. Three of the mini centers were individual projects and two of them were collaborative group projects. Any of these could be a great little standalone project for a traditional classroom or a demo/challenge activity for a full or modified TAB Choice Classroom. They are all actually ideas I ran across on Pinterest, so none of them were super original. Each center had slightly different supplies and different attachment tools and materials available.
The kids self-selected a group of 4-5 to work with for the unit and traveled from table to table to complete one project at each table. Each team had a group shoe box for storing their projects until the gallery walk on the last day.
The unit ran longer than I had planned, since kids needed and wanted a full 55 minute period to do each center. You can tell which centers were most popular by which projects students selected for their artsonia upload.
About the 5 mini centers:
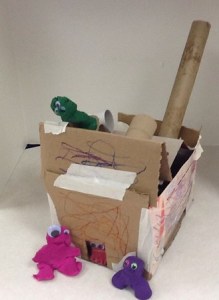
The first center was a group cardboard Dr. Seuss House, found on this website. Students had tape, scissors, tons of different types of cardboard boxes and tubes. At the table “menus” explained how to use tabs, flanges and l-braces. There was a “size test” box that students had to fit their house in and work needed to pass the upside down test. Lots of collaboration and problem solving at this table! (And lots of MESS!) We didn’t have time to paint them during this unit, but students were told that they could chose to paint them in a future studio day. This center was popular and the results were successful. But oddly no one wanted to have them for the gallery walk or take them home. Perhaps because they feel unfinished without paint?
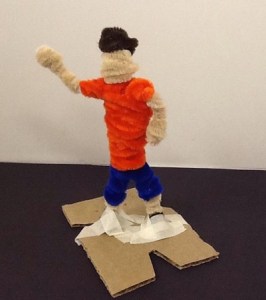 The second table was a wire person or animal based on this project. I used pipe cleaners, yarn and torn fabric strips. Students had access to tape, but not glue. The goal was to have a free-standing figure (that could be taped to a cardboard base) that had volume. They were encouraged to show movement and be creative with the figure’s pose. Most kids really enjoyed this table and came up with some great figures! If I was doing this as a traditional stand-alone project, I would include some art history and talk about Alberto Giacometti. I might add that to the mini menu that include at the center.
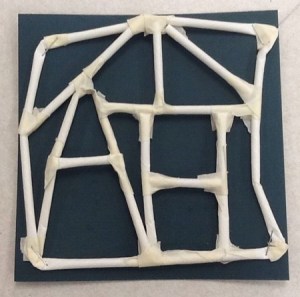 The next center was a relief sculpture using tape and straws. It was inspired by this gallery of kids work. This was a difficult table. I really only had examples with the explanation that they should include one or more initials and “hide” them in other designs. Perhaps I needed more directions or more examples, or it was a matter of fine motor skills. Many students still created good work and certainly lots of problem solving occurred at this center, but the kids weren’t really as engaged in this project. Probably not one that I will repeat. I will come up with a new way to learn and make a relief sculpture.
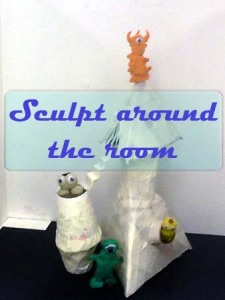
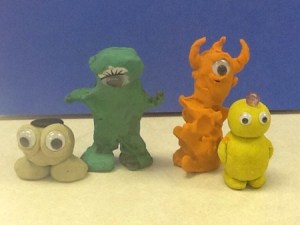 The student favorite center was the modeling clay mini monster one. The menu had several cute images of clay monsters, most made from sculpty. We were using modeling clay but the results were still great. The requirements were that it had to stand and it had to have texture. The dollar store toothbrushes and toothpicks were the favorites for making textures. They also had a variety of beads, buttons, baubles and googley eyes to add to the monster. I had a size test box at this center too. BE WARNED this center used a lot of clay. I had to go out in the middle of the week to buy more clay. I put what I thought was a day’s worth of clay at the center for students to self-ration. I believed the size test box would help the students limit the amount. Not sure if I misjudged, or they were stealing it?? But we ran out way too quickly. So I switched to handing out the clay in pre-portioned chunks.
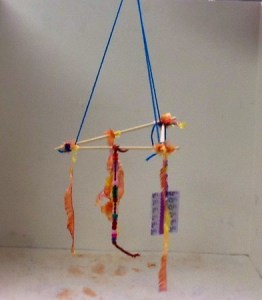 The final center was a team kinetic mobile. This also was a difficult table for the students. But eventually most teams came up with a working solution. They had no tape or glue at this center. Only string, yarn, paperclips and brads were available to attach the objects to a hanging structure. You wouldn’t think middle school kids would have so much trouble with tying knots! but wow! So this center will get some different materials and resources, images and menus for next time.
About the Set-up: It took a few weeks for me to get supplies ready for all these centers. I had a copy paper box for each one, taped the list of supplies that belonged in the box with the title and number of the center on both ends and then had labelled gallon zip lock bags with the needed supplies. My mini center “menus” were color prints out from slide show that had some example images, directions and expectations. These were in plastic sleeves for kids to easily access in each box. Normally, I like to laminate these things, but it was still in flux and I was changing things as we went, so I didn’t. This was a good choice. So much to tweak for next time. I also had some picture vocabulary cards at each table for students to write on their worksheet.
Time Frame: I had hoped for students to get thru 2 tables per 55 minute class period. But that did NOT come close to the time needed. They wanted and needed a full period for each center, so I gave it to them. I think I will also reduce the vocabulary next time to keep the writing part to a minimum and match the word to the main concept at the table.
Assessment: Originally, I had planned to just give them some points for the worksheet and then grade the final work they would choose for the gallery walk. But as I saw some kids really excelling on some skills and really floundering on others I decided to give a small 5 point score for each center, based on one or two small criteria each. Table 1 and 5 were based on team work, wire person based on standing and having volume, clay monster based on standing and having texture and the straw one, I am scrapping as a grade because it just didn’t meet my expectations for learning and engagement. The other assessment will be in the peer critique at the gallery walk next week.
Changes Over the Years
2020-2021 Sadly no around the room games during Covid times… I look forward to ramping these up again once the sharing materials restrictions are lifted.
2017 Updates This activity take A LOT of prep work. It is a lot going on and some classes just can’t handle it all. I have varied the activities over the years based on the materials I had available. Projects just didn’t work well were scrapped and replaced with other projects.
What kind of sculpting skill building do you use in your classroom?
What supplies are most popular with your kids?

